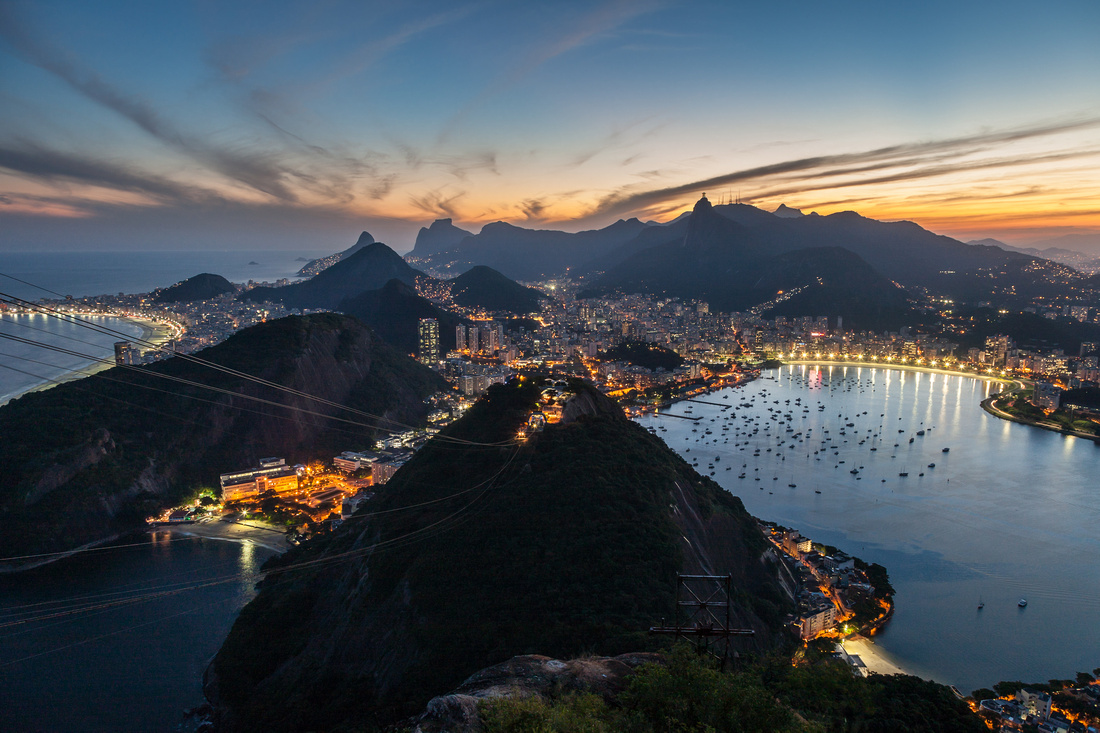
I find the views from Pao de Acucar (Sugar Loaf Mountain) are simply outstanding. We spent most of the late afternoon and early evening at Sugar Loaf, timing the visit to take in the sunset and twilight views.
I brought along my trusty Canon 5D DSLR and just one lens (24-105 f/4 L IS), a tripod and 3-stop graduated ND filter. I was fortunate that a few of my images were featured by National Geographic, including one published in a book.
The following are a few highlighted images from the trip.
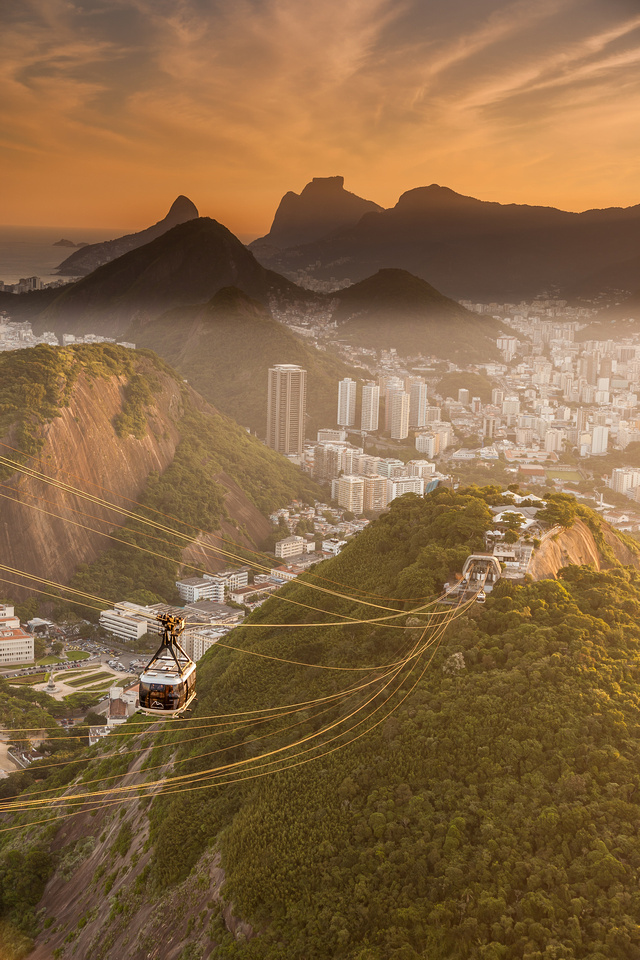
Rio at Sunset
I wanted to capture the beautiful colors and cloud patterns in the sky, along with side-lighting from the sunset. The inclusion of the incoming cable car helped to provide a more dynamic feel and a sense of place.
Rio at Dusk
The city lights were being turned on just after sunset.
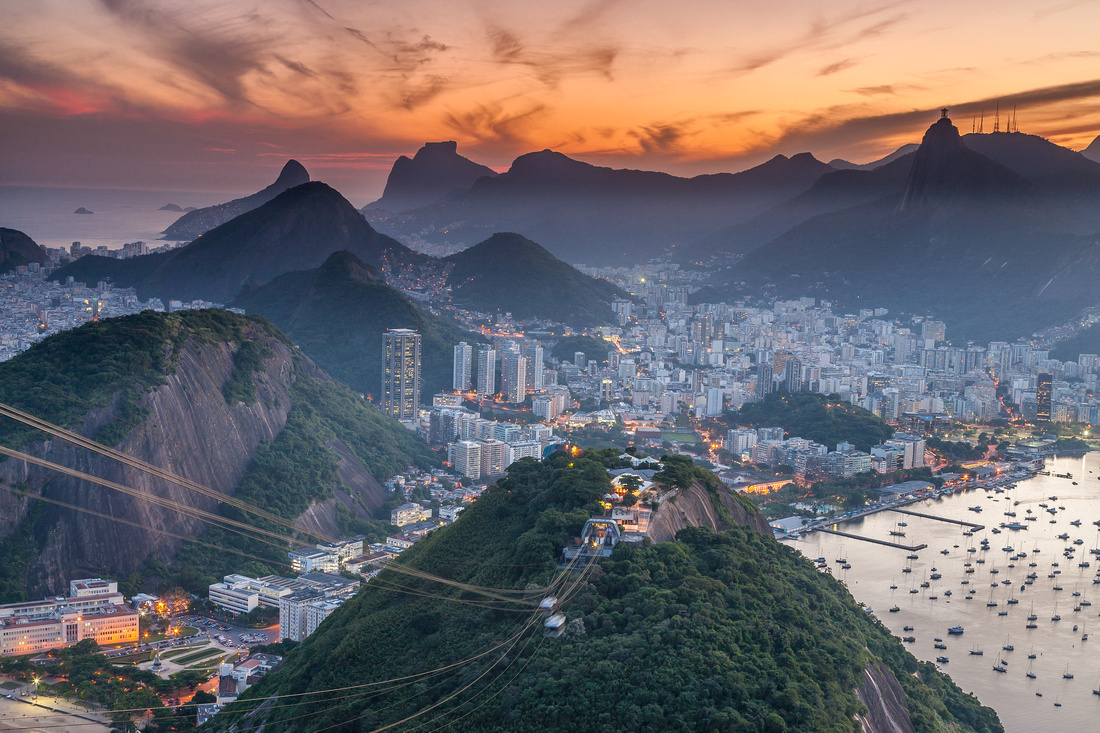
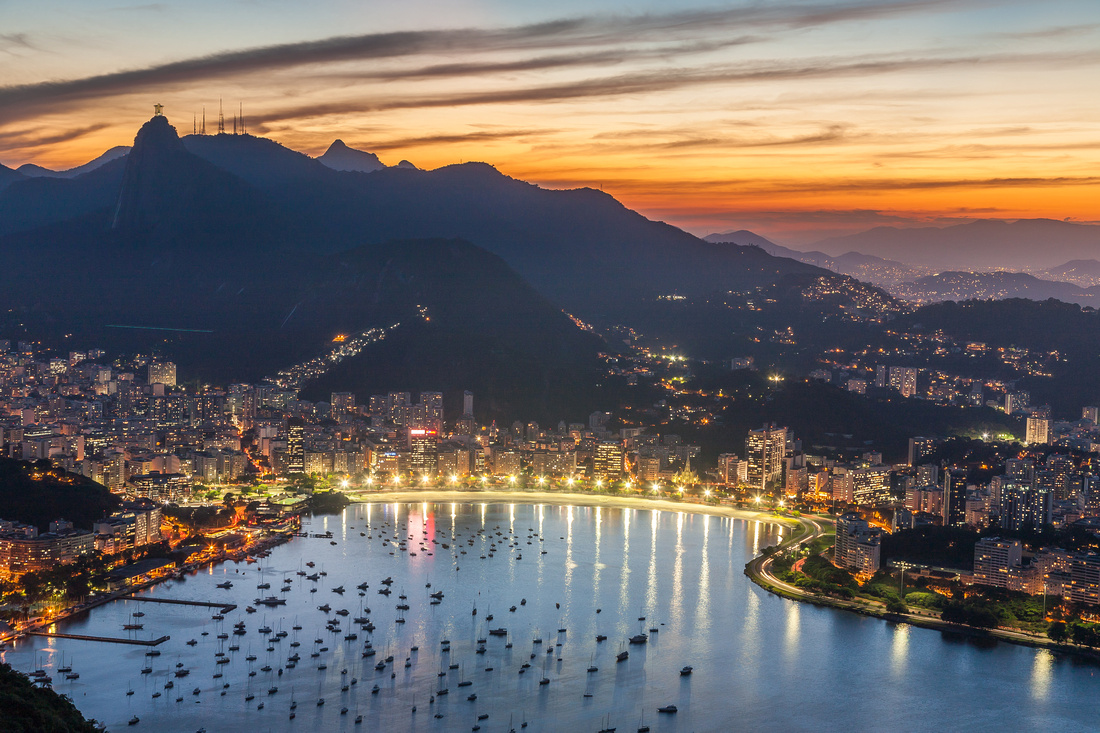
The following image was published in National Geographic's Four Seasons of Travel book (2013). The illuminations of the buildings blend nicely with the sunset sky. In the foreground are boats near the Botafogo district.
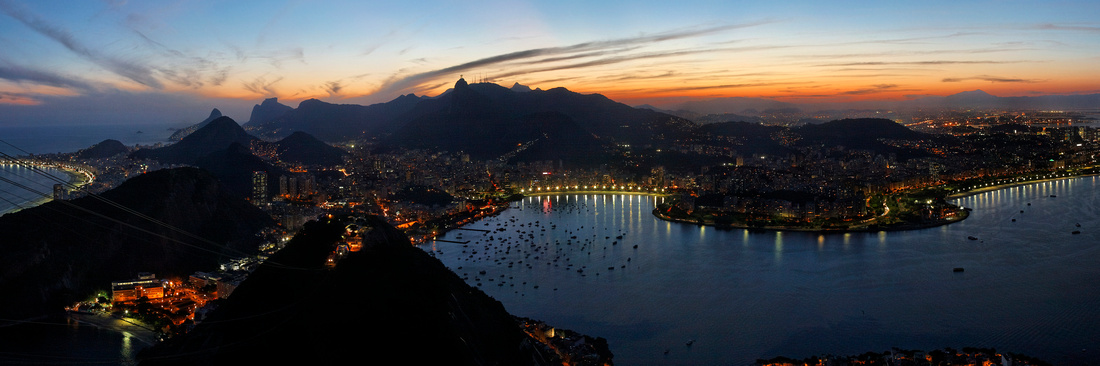
National Geographic featured the following panoramic composite image in their Your Shots: Brazil gallery.
Additionally, the following image was featured in National Geographic Your Shots: Night Pictures.
For more images on Brazil, including those taken at Iguazu Falls, please visit my photosite.
]]>
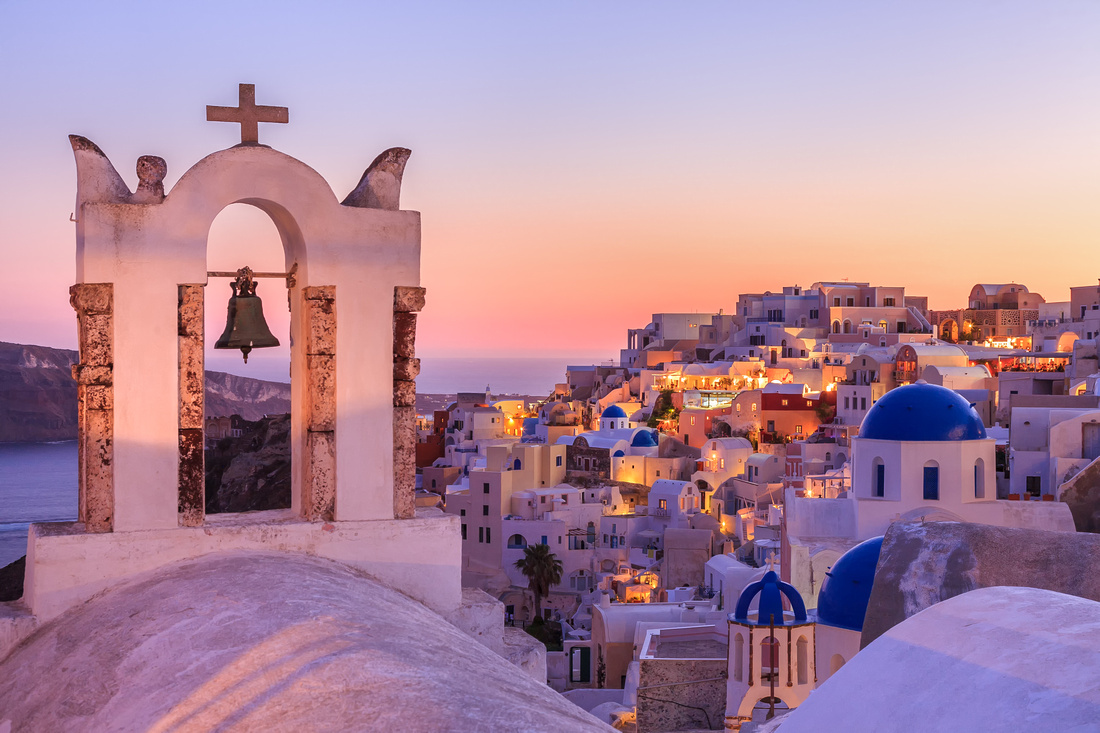
"A Beautiful Evening at Santorini".
The buildings in picturesque Oia village are located on sheer cliffs on the northern tip of the volcanic Santorini island.
This image is also part of natgeocreative.com (Picture ID: 1433547).
I took this image with a Canon 5D with 24-105 f4L IS lens on a tripod. Exposure setting: 47mm, f/8, 4s, ISO 200.
Click the highlighted link to see more of my images from Greece.
]]>
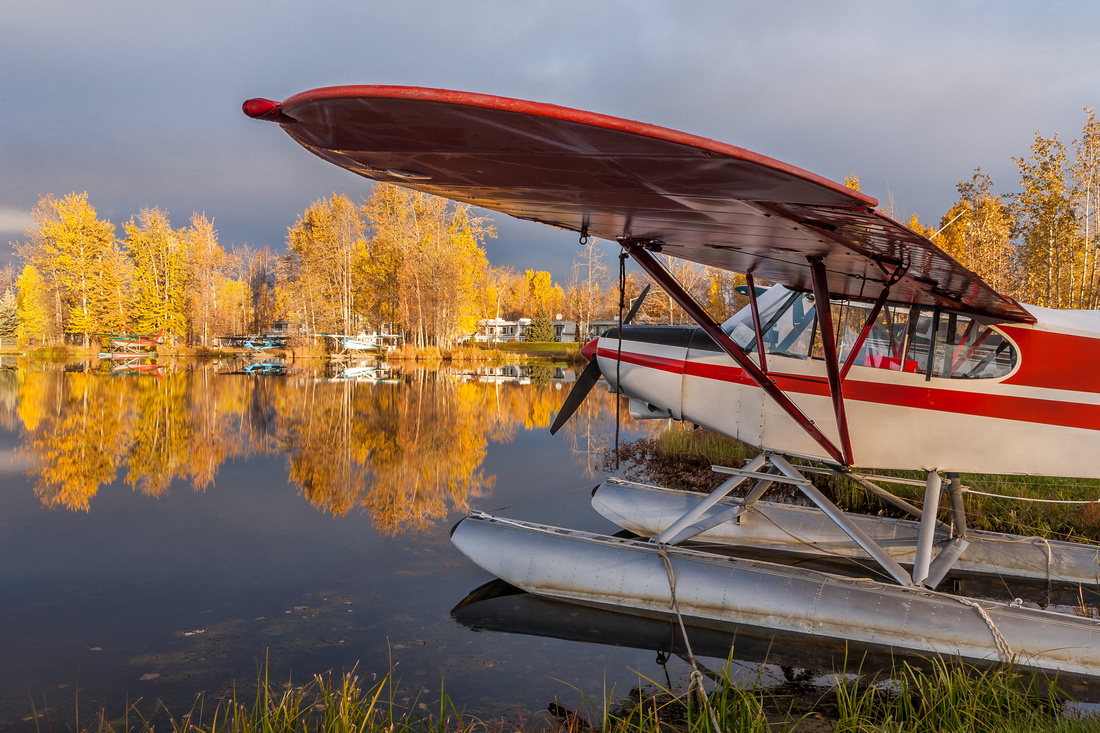
The first image was "Let's Fly".
Mirror-like reflections of float-planes and brilliant autumn colors at Lake Hood, Anchorage, Alaska. Lake Hood is the largest and busiest seaplane base in the world.
I took this image with a Canon 5D with 24-105 f4L IS lens on a tripod. Exposure setting: 32mm, f/16, 1/4s, ISO 100.
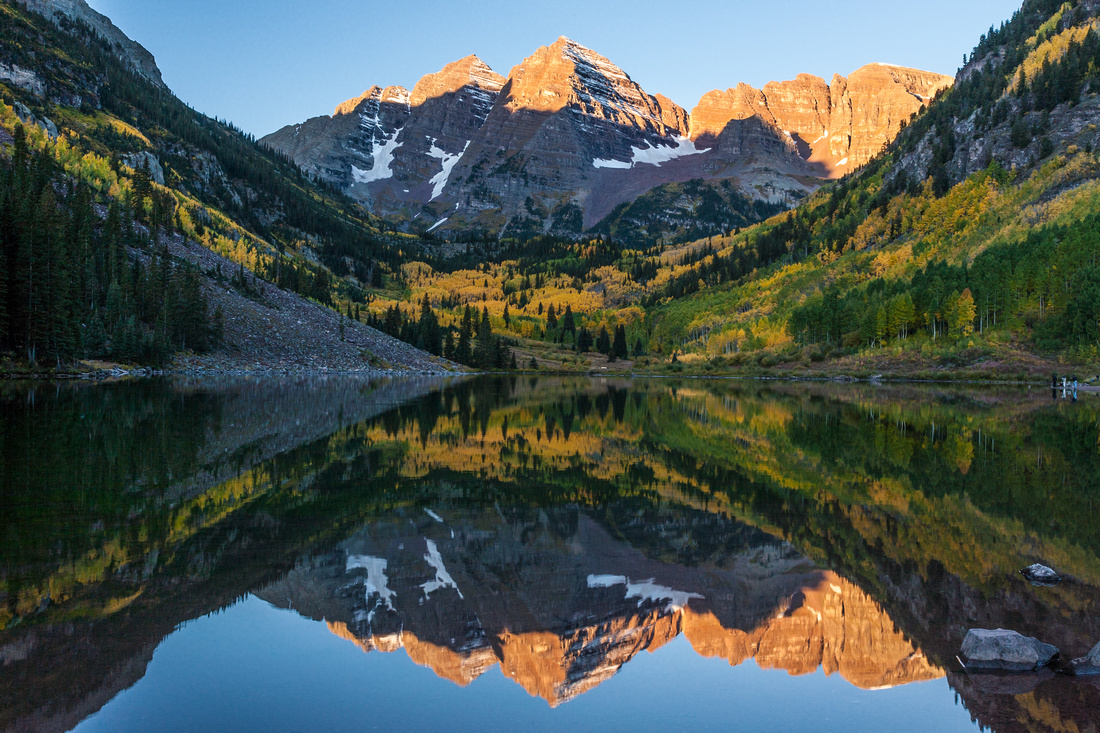
The second image featured was "Autumn Reflections".
Maroon Bells is a very picturesque and accessible site near Aspen, Colorado. The leaves of aspen trees turn golden yellow during the autumn season. Image taken as the morning sun hit the tops of Maroon Bells, with mirror-like reflections on the lake.
I took this image with a Canon 5D and 24-105 f4L IS lens on a tripod. Exposure setting: 35mm, f/16, 1/4s, ISO 200.
Click the highlighted links to see more of my images from Alaska and Colorado.
]]>
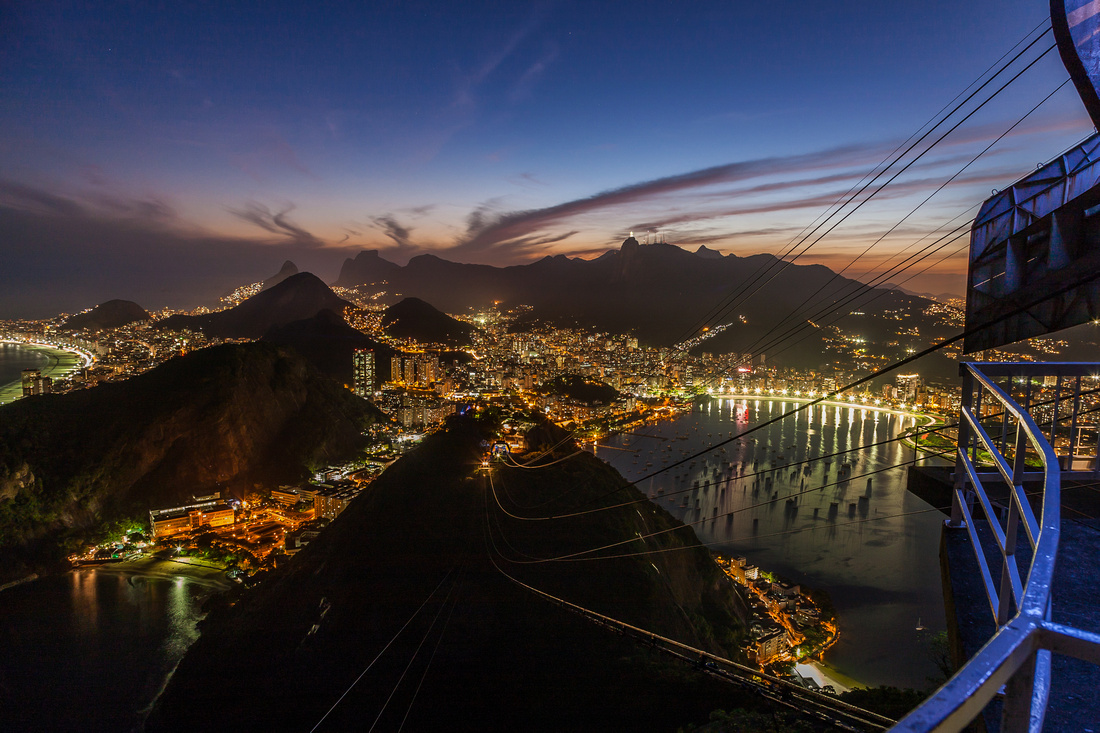
The first image was "Rio at Night".
Fabulous view of Rio de Janeiro and its surrounding neighborhoods from Pao de Acucar (Sugar Loaf) mountain, Brazil. The view from Sugar Loaf is one of the finest urban vistas in the world. In the foreground are lines for the cable cars taking people up from Morro da Urca to Pao de Acucar.
I took this image with a Canon 5D with 24-105 f4L IS lens on a tripod. Exposure setting: 24mm, f/8, 20s, ISO 200.
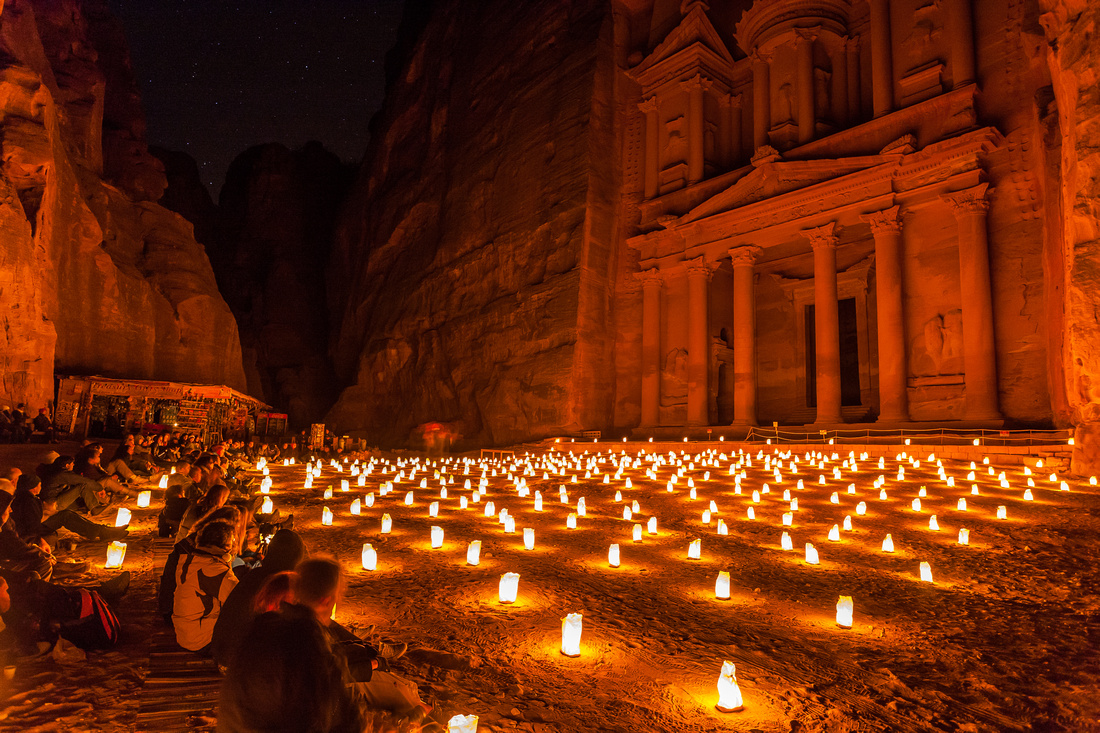
The second image featured was "Petra at Night".
The Al Khazneh or Treasury illuminated by candle-lights during the "Petra by Night" show. Petra is a UNESCO World Heritage Site and is famous for its many rock-cut monuments by the Nabateans. Petra is "touristy" but still well worth the visit. The walk to the Treasury takes a good 20 to 30 minutes from the main gate; I'd recommend bringing a flashlight for additional lighting along the pathway.
I took this image with a Canon 5D and 17-40 f4L lens on a tripod. Exposure setting: 17mm, f/5.6, 10s, ISO 800.
Click the highlighted links to see more of my images from Brazil and Jordan.
]]>I took along my trusty Canon 5D DSLR with two lenses: 24-105 f/4 L IS, and 50mm f/1.8 II. The latter is a cheap, lightweight and small lens that I generally include in my travel backpack for use in low-night handheld situations or when I want something light.
This article is focused on the Alhambra palace area.
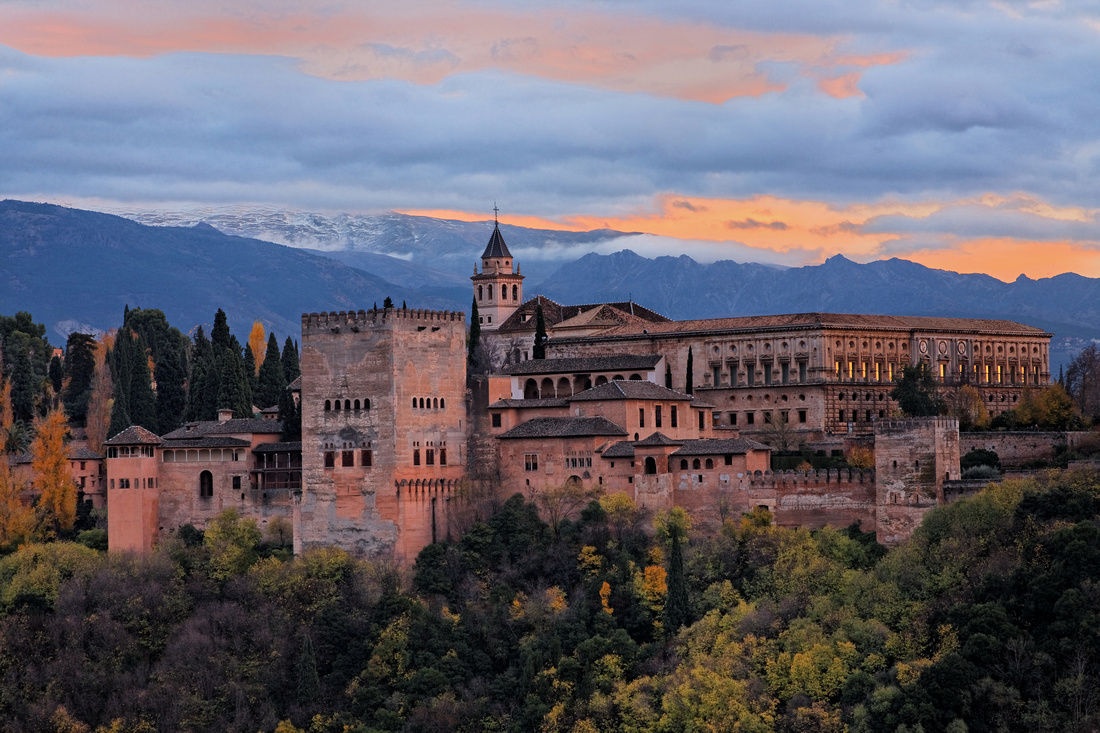
Alhambra at Sunset (Canon 5D, 105mm, f/11, 0.5s, ISO 200)
I took this from the popular San Nicolas viewpoint in Albayzin quarter, Granada. The sun has just set to the right of the image with some rain clouds and last colors in the sky. There is some early snow at the top of the Sierra Nevada mountain in the background.
This image was published in National Geographic's World's Best Travel Experiences book (2012), and is also part of NationalGeographicStock.com (Picture Id: 1414718).
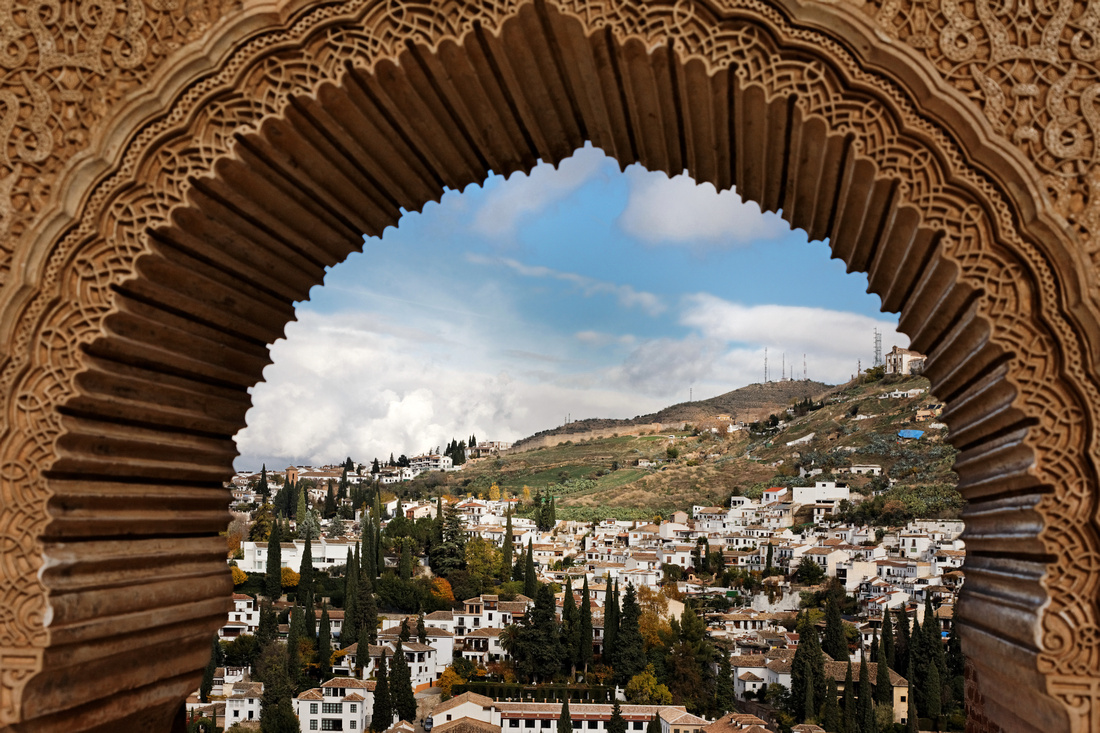
View of Albayzin Quarter (Canon 5D, 50mm, f/11, 1/250s, ISO 200)
The dominantly Moorish quarter of Albayzin framed by the ornate window arch at Alhambra palace.
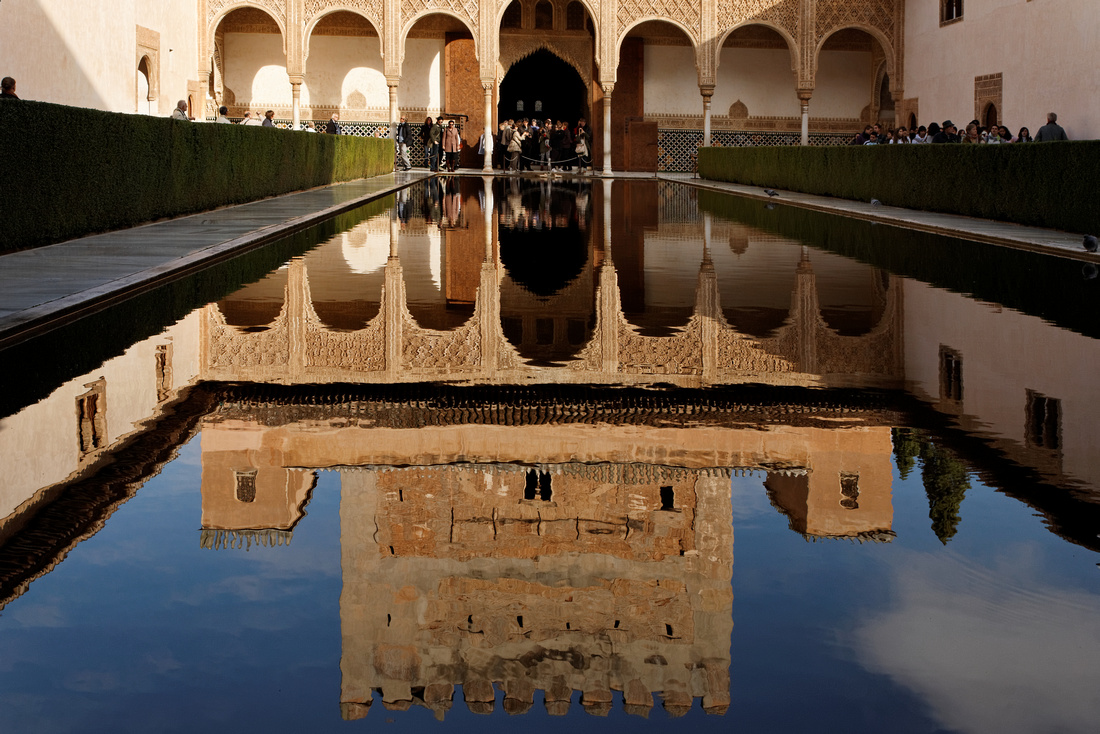
Alhambra Reflections (Canon 5D, 32mm, f/11, 1/90s, ISO 200)
Beautiful reflections on the pool at Court of Myrtles on a sunny morning.
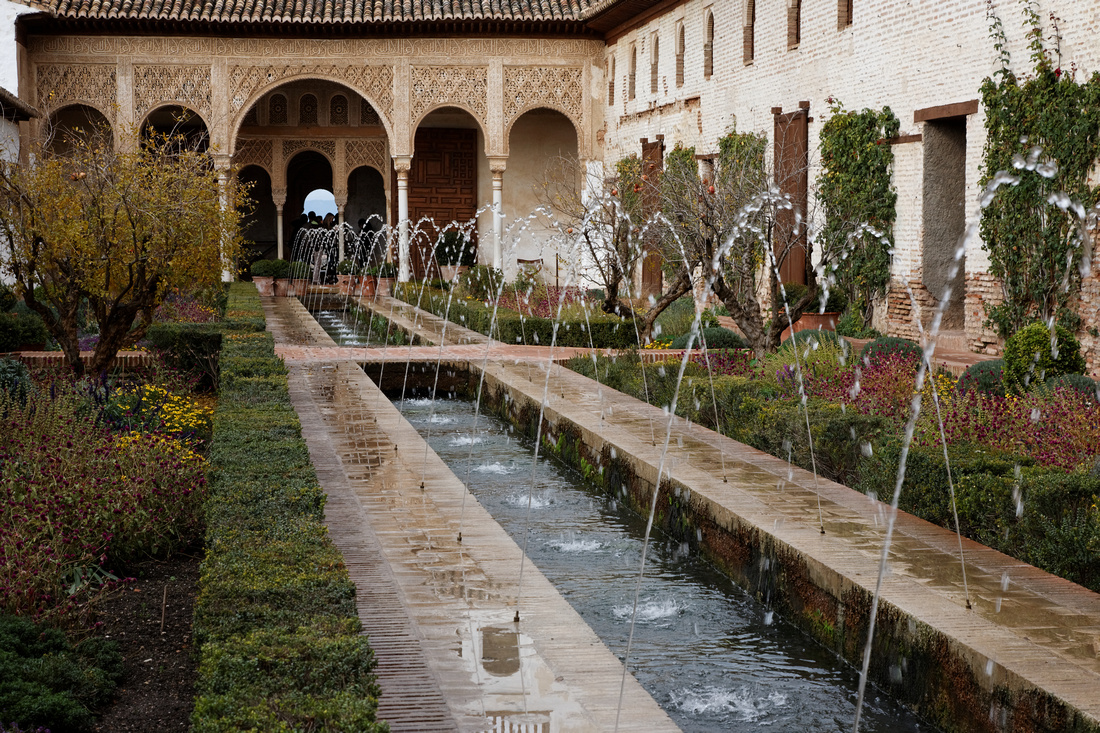
Water Fountains (Canon 5D, 67mm, f/11, 1/125s, ISO 200)
Water fountains at Patio de la Acequia, part of the Generalife Gardens.
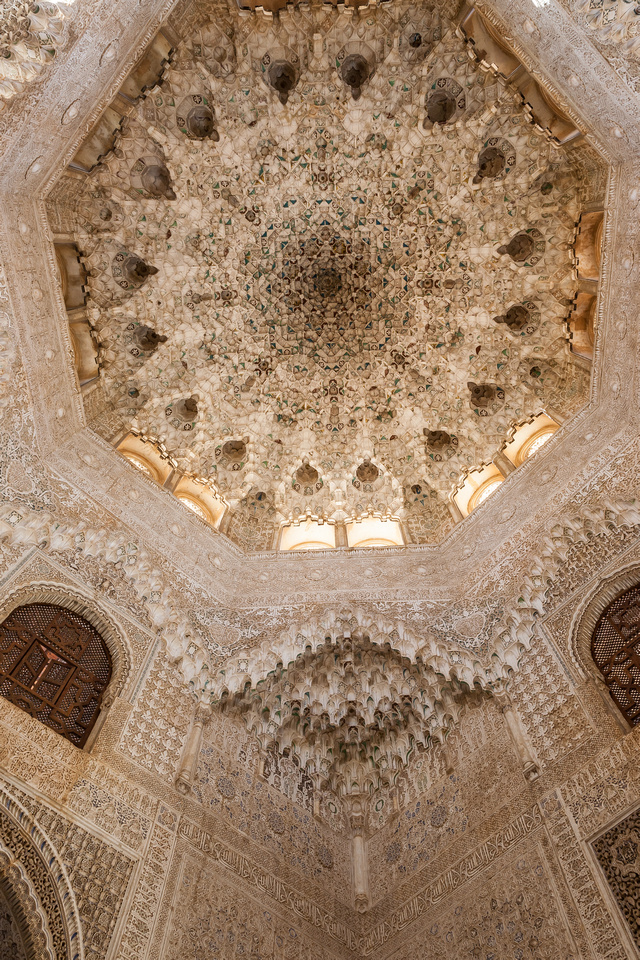
Islamic Architectural Details (Canon 5D, 24mm, f/11, 1/3s, ISO 200)
Islamic architectural details inside the Palacio Nazaries at Alhambra, Granada.
You can find more images of Spain at my photo site.
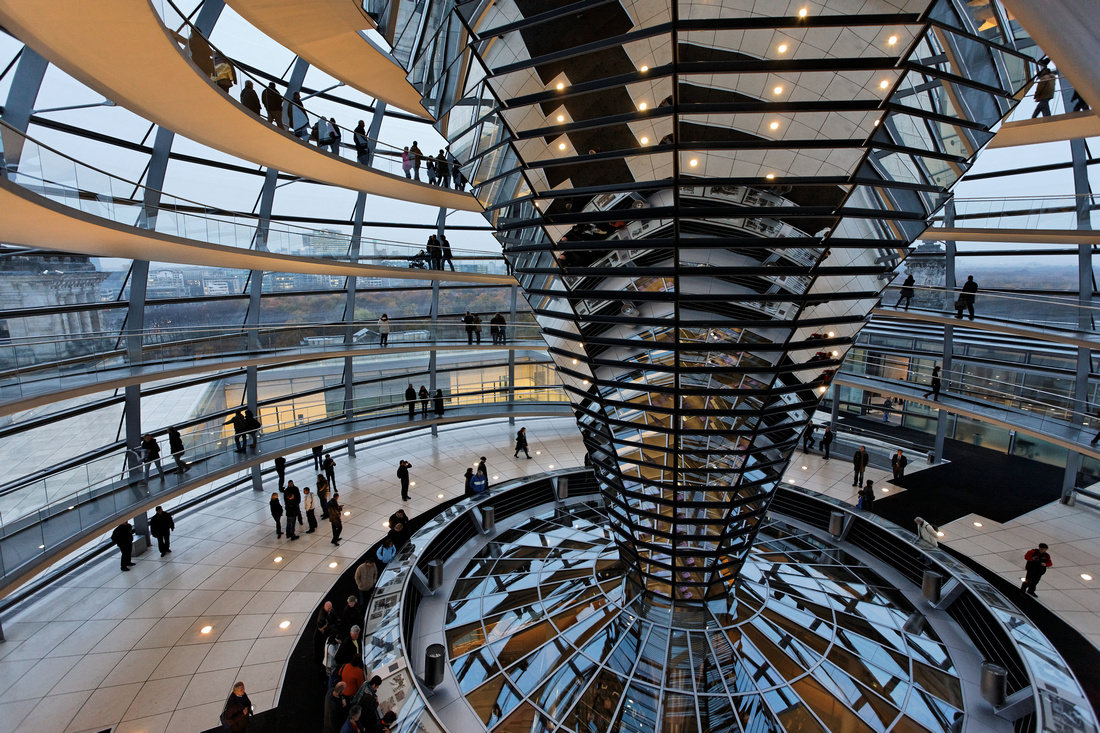
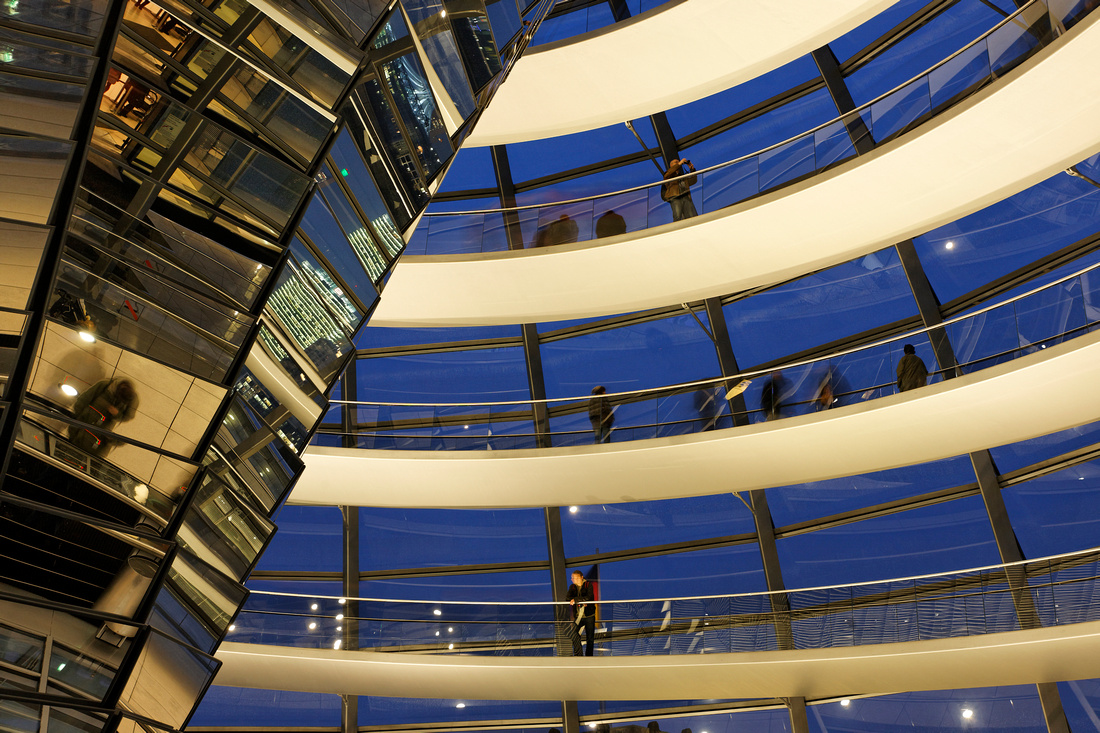
]]>I particularly enjoyed the spacious and ultra-modern glass dome inside the Reichstag (Parliament) building. The Reichstag was restored based on a design by Sir Norman Foster following the reunification of Germany. This is one of the most visited sites in Berlin.
I took the following image while walking up the ramp of the glass dome using the wide angle lens. It turned out to be my most published and featured image by National Geographic Traveler.
This image was published in the Mar-2011 issue of Nat Geo Traveler magazine and Dec-2013 issue of Nat Geo "Best City Weekends" bookazine. It was also featured in Nat Geo Traveler "Your European Cities Photos" (Jan-2011) and "Your Germany Photos" (July-2011).
Reichstag (Canon 5D, 17mm, 1/20s, f/5.6, ISO 800)
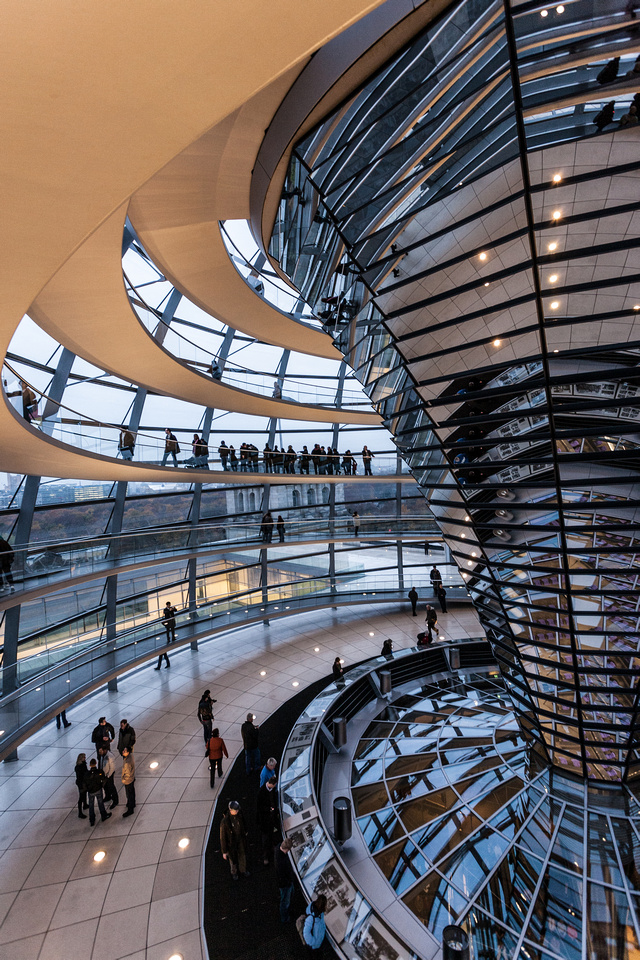
Other views inside the glass dome.
Reichstag Glass Column (Canon 5D, 17mm, 1/30s, f/5.6, ISO 800)
Reichstag (Canon 5D, 40mm, 3s, f/8, ISO 100)
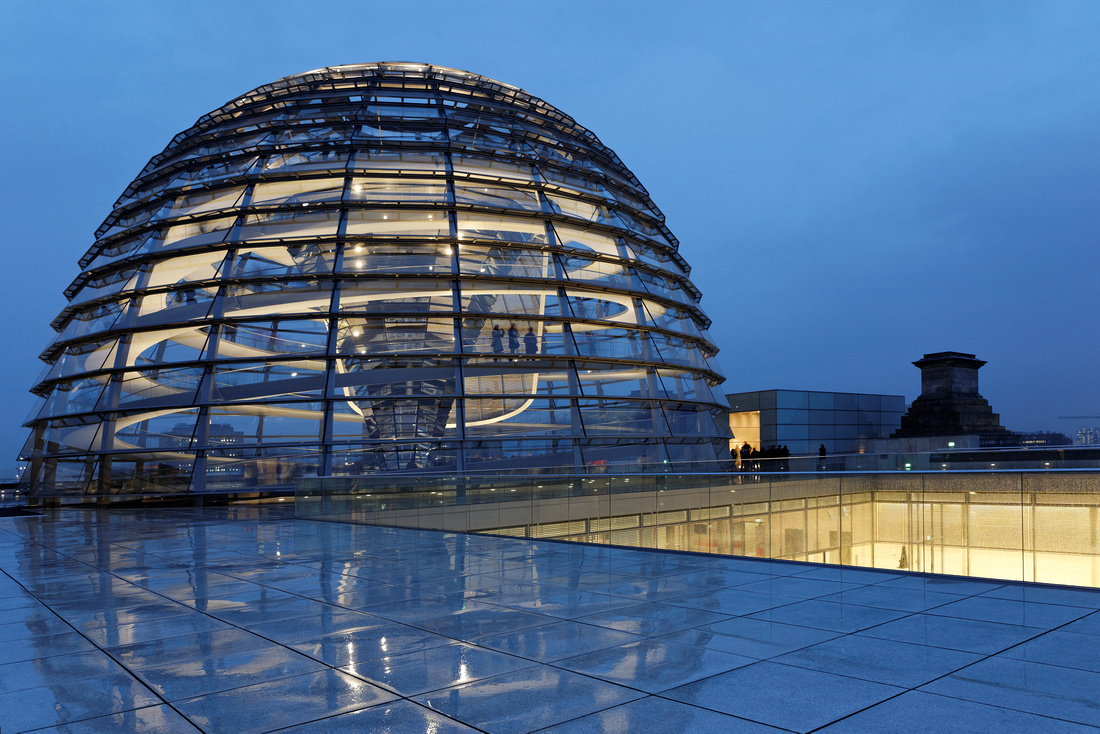
Here's another view of the illuminated glass dome with reflections on the roof-top. It was raining and I protected the camera with an umbrella.
Reichstag at Twilight (Canon 5D, 25mm, 3s, f/8, ISO 100)
You can find more images of Berlin at my photo site.
]]>Photographic images come in various sizes. The popular 35mm format is 1.5x1 (width x height). Panoramic images typically have aspect ratios of 3x1 or larger, similar in size to that generated by expensive, film-based 6x17 format.
Why bother with panoramic images? I find them pleasing to the eye, capturing a wider view of the landscape or cityscape and being able to print the image at large scale; see examples below.
Rio de Janeiro, Brazil. This image was featured on National Geographic Traveler "Your Brazil Photos".
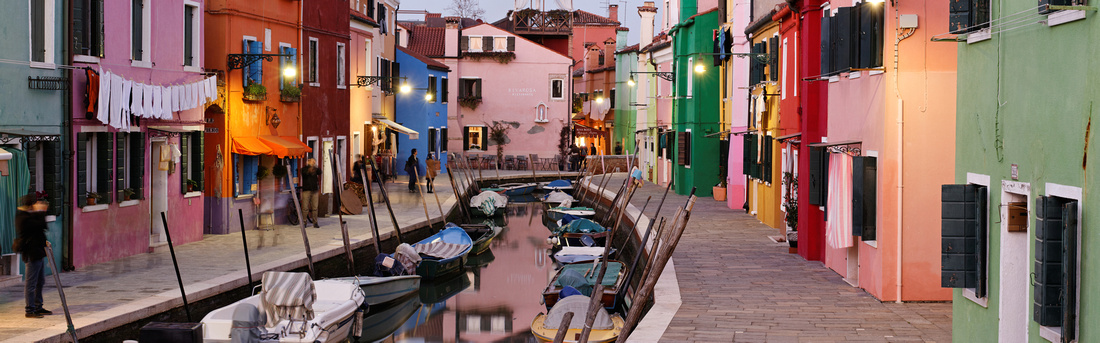
Burano at Twilight, Italy. I made a beautiful 16x48" canvas print of this pano for my living room.
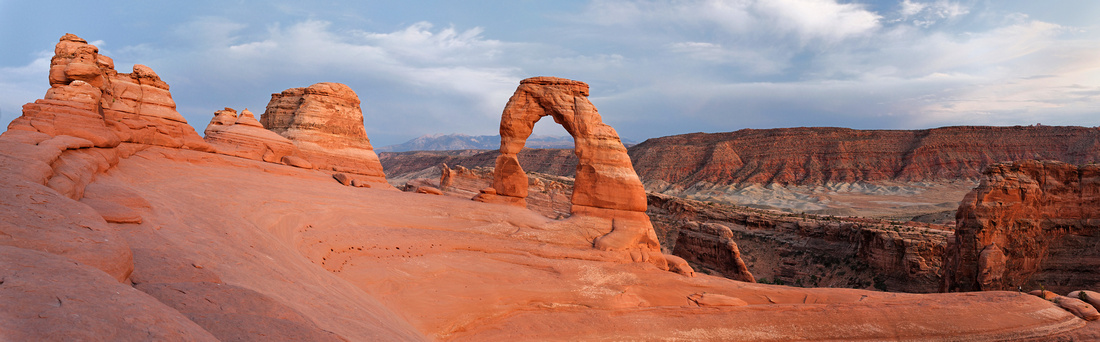
Delicate Arch, Utah
Generating Panoramic Image(s)
- Keep the camera level: bubble level, tripod & cable release very useful
- Set focus on main subject of interest, then switch to Manual focus
- Use Manual settings for camera exposure (expose for brightest scene)
- Pre-select a White Balance (can adjust later if shot with RAW setting)
- Recommend shooting in RAW format (and JPEG)
- Overlap by 30-50%
- Shoot as quickly as possible
- You may want to process RAW into JPEG files using same white balance, remove dust, etc.
- Then use a stitching software, e.g. Photoshop, Elements, autostitch, PTGui, etc. I have been using PTGui for several years.
- Import the stitched panoramic image into your favorite editor. Do final editing, dust removal and cropping.
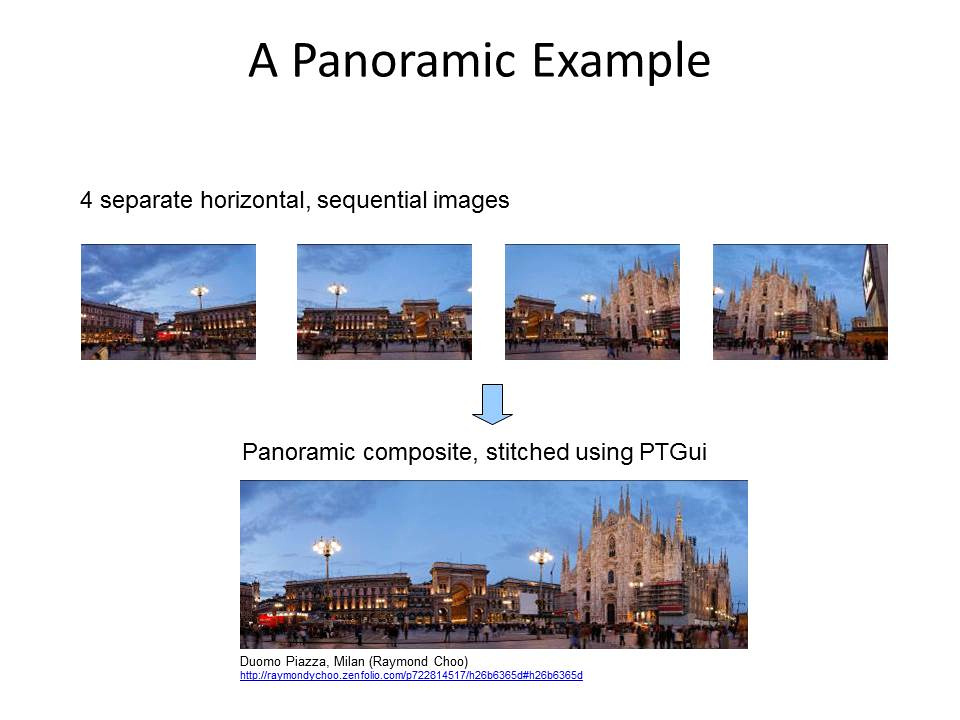
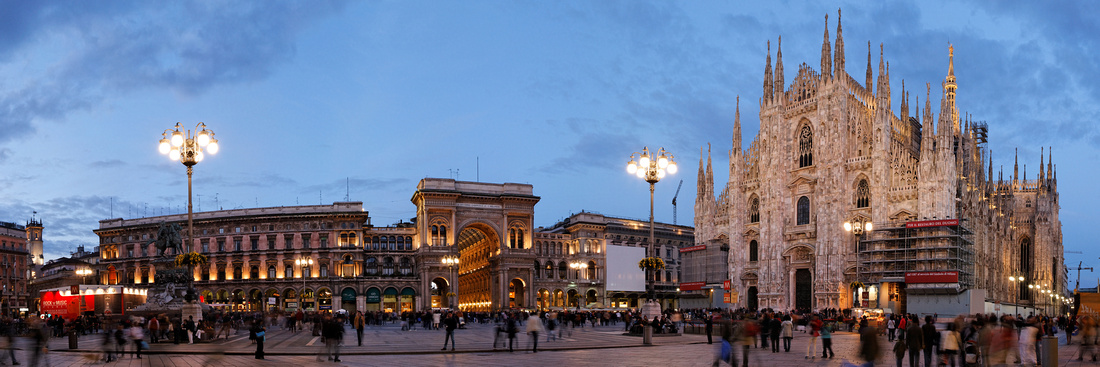
Duomo Piazza, Milan
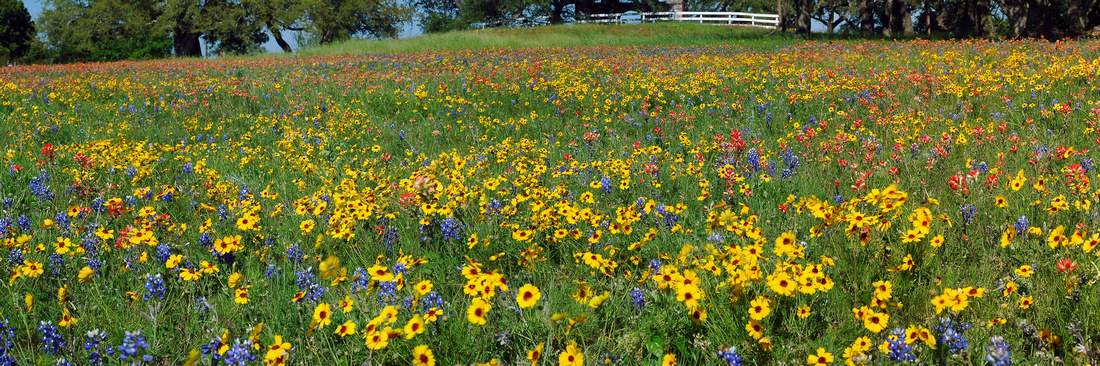
Texas Wildflowers
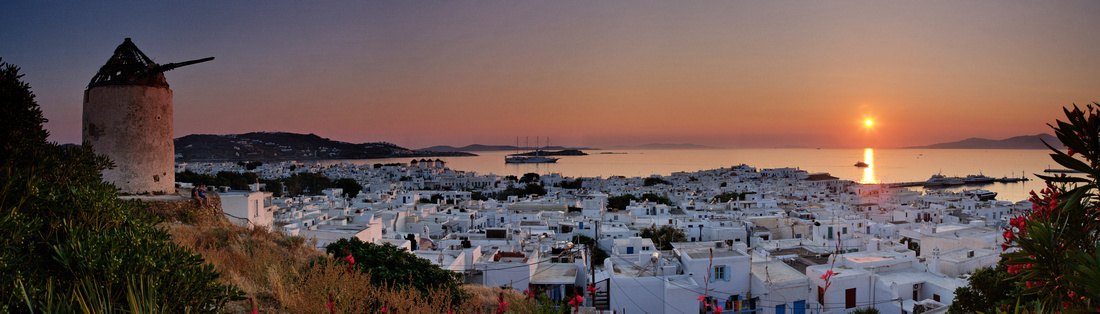
Mykonos Sunset, Greece. I used a 3-stop graduated ND filter with each of the overlapping images.
Other Considerations
- Panoramic composite images work best for “static” (e.g. landscape) conditions and mid-to-longer lens scenes.
- Watch out for movements in/out of frames (e.g. people, vehicles) – can mitigate with long exposures (low-light or ND filter).
- Scenes taken at wide angle (<28 mm) that includes dominant foreground objects generally will be more difficult to align properly in panoramas and will have more distortion.
- High-contrast scenes, e.g. bright sky and shaded areas, are more difficult to handle (may need to use graduated ND filter or use of HDR/multiple exposures for each image).
- Do not use polarizer; otherwise, you could end up with uneven lighting in the images and they look odd in the stitched panorama.
- Other tip: for highest resolution, shoot in vertical/portrait mode to generate a horizontal/landscape panoramic format.
]]>
One real pleasant surprise with my switch to the mirrorless Fujifilm X-E1 was finding relatively affordable third party manual fisheye lenses. These are made by the same Korean company and marketed under various names including Samyang, Rokinon, and Bower.
I bought the Bower 8mm f/2.8 fisheye. The lens is small (2.2", 56mm long) and gives an effective 12mm (full-frame equivalent) fisheye with 180 degree angle of view coverage. That’s pretty wide and I had accidentally photographed my fingers, feet or tripod feet with it. Check the edges of your focusing screen before taking the shot.
The lens comes with a permanent lens-hood; it does a decent job overall with flare-control considering its super-wide coverage.
There are no electronic contacts, so auto-focusing and electronic info is not transferred between the lens and camera. The EXIF info for aperture will default to f/1. That's a bit annoying but that is the downside for a manual lens.
Set up
Using the lens for the first time. Set Mount Adapter Setting in Shooting Mode in the camera to 8mm, so the focal length is properly recorded in EXIF. This needs to be done once only (unless of course you also use other manual lenses with the camera).
Other camera settings (to be repeated) whenever you change from using a Fujifilm AF lens to using the manual fisheye lens.
- Set “Shoot without Lens” in Shooting Mode of camera menu to “ON”
- Set Focus Mode Selector button in front of the camera to Manual "M" mode
Guidelines & Examples
Below are guidelines for camera/lens settings based on my experiences with using the fisheye lens over the past year. Using the manual fisheye is relatively straight-forward with Aperture priority.
Using tripod for best image quality:
- Set ISO to 200; select appropriate aperture – f/8 is a good starting point. The fisheye lens gives great depth of field.
- Set manual focusing ring distance to 1m (3 ft), unless there are objects nearby. You can check focus using Focus Peaking.
- Compose in camera.
- Shoot with camera release or self-timer.
- The camera will set appropriate shutter speed. Check histogram and adjust exposure compensation accordingly.
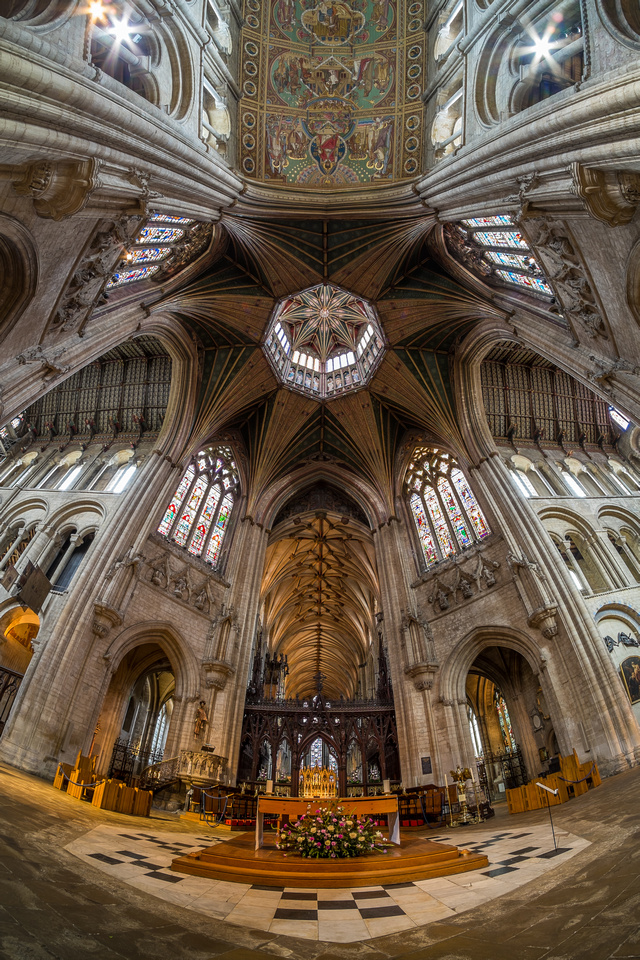
Here's an example of an interior architectural shot of the beautiful Ely Cathedral in Cambridgeshire, England.
Ely Cathedral (Fujifilm X-E1, 8mm, 3.5s, f/8, ISO 200)
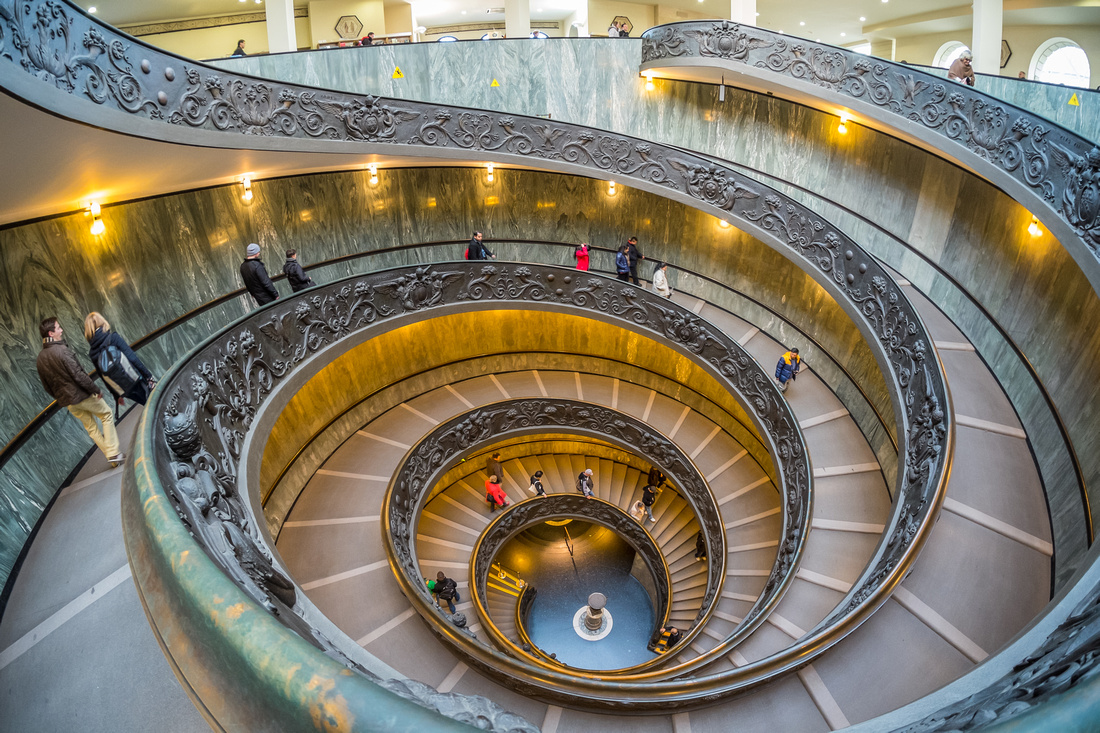
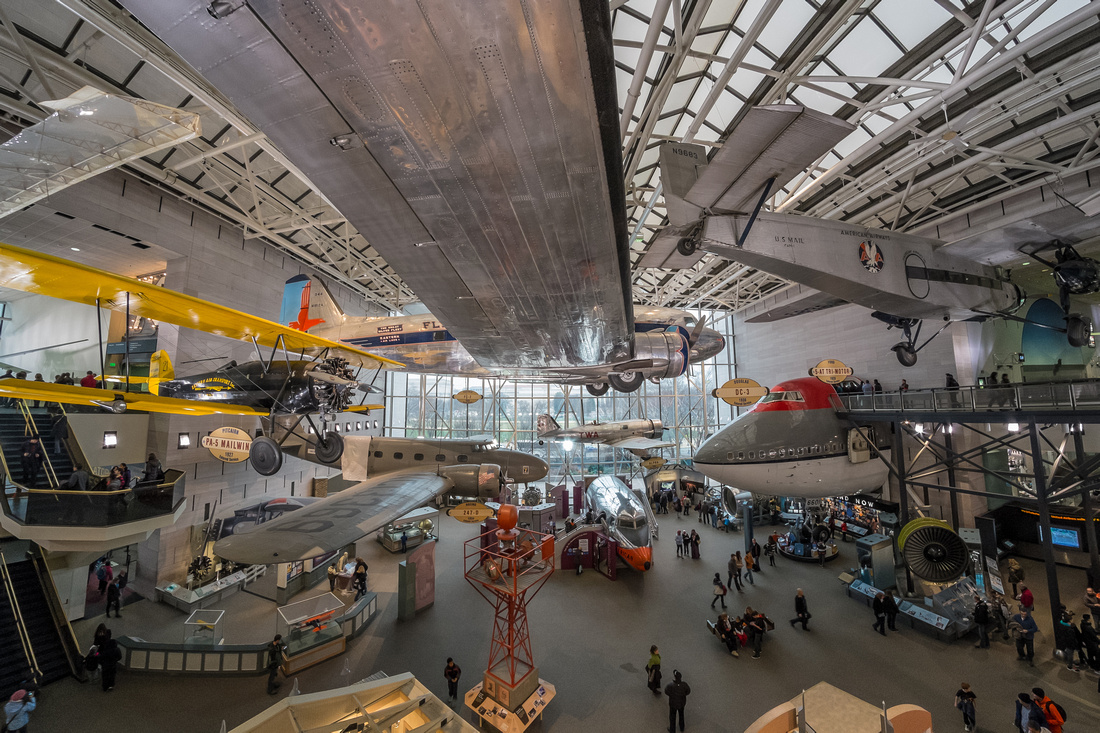
Hand-held: especially in places where use of a tripod is not convenient or allowed (i.e. most museums and busy places).
-
Hand-held Indoors with low lighting:
- Set shutter speed to say 1/30s or 1/15s.
- Set aperture to f/5.6
- Set ISO to “Auto 6400”
- Compose, take image.
- Check histogram, and adjust exposure compensation accordingly.
Vatican Staircase - Looking Down (Fujifilm X-E1, 8mm, 1/30s, f/5.6, ISO 2500). This image was featured in National Geographic Your Shot: Italy.
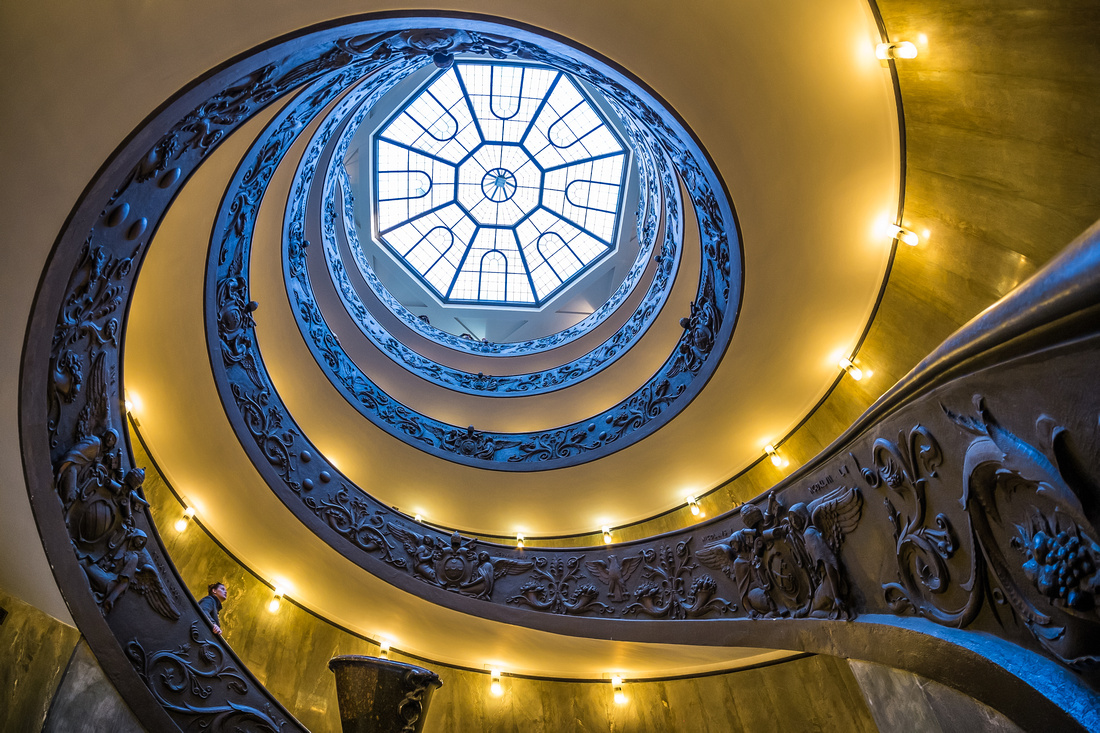
Vatican Staircase - Looking Up (Fujifilm X-E1, 8mm, 1/15s, f/5.6, ISO 500). This image was featured on National Geographic Travel 365 on 24-Feb-2014.
Air and Space Museum, Washington DC (Fujifilm X-E1, 8mm, 1/15s, f/5.6, ISO 2500).
-
Hand-Held Outdoors with good lighting (Aperture Priority):
- Set ISO to 200
- Set aperture to f/8 or f/11
- Compose, take image.
- Check histogram, and adjust exposure compensation accordingly.
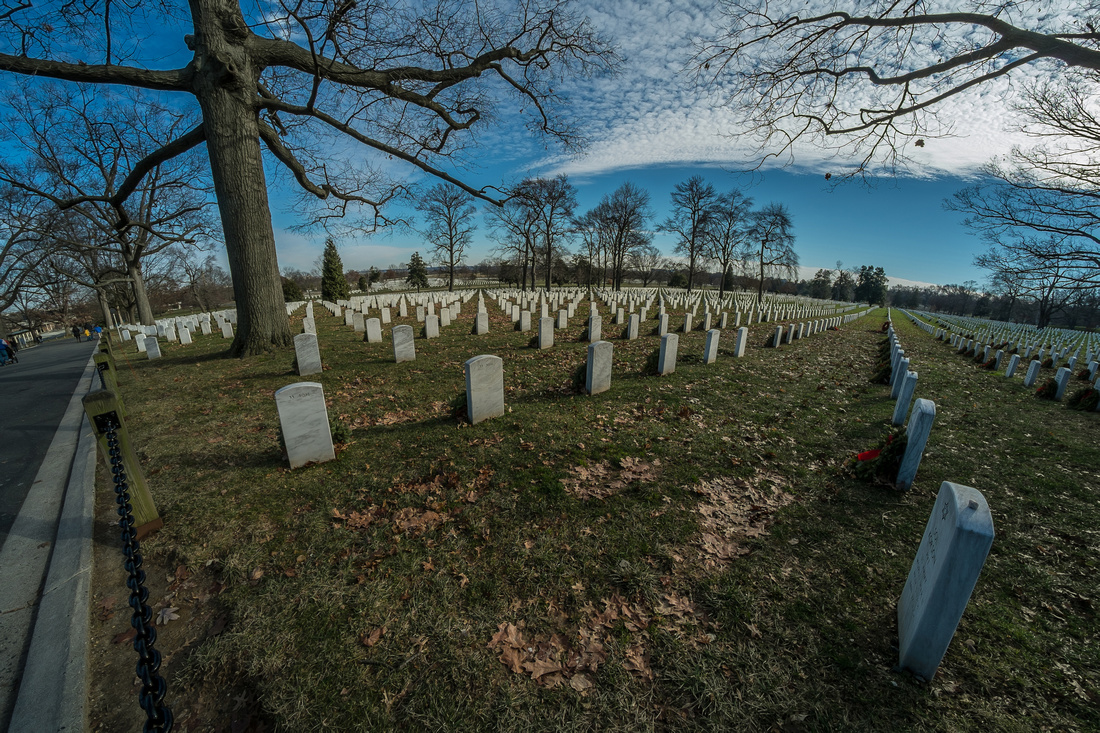
Arlington National Cemetery, Virginia (Fujifilm X-E1, 8mm, 1/180s, f/11, ISO 200).
Be sure to reset camera settings upon changing out the fisheye lens to your Fujifilm AF lens. Two main areas to reset:
- Reset “Shoot without Lens” to “OFF”.
- Reset the Focus Mode Selector button in front of the camera to Auto-Focus mode (S or C).
Overall, I’m happy with the value and image quality from this lens. It opens up more creative possibilities; it is small and fun to use. It is especially great when working indoors with circular, spiral shaped architectural elements.
]]>I have been using my trusty Canon 5D DSLR for several years. I have taken it to many journeys and I have captured some memorable images, including several published in National Geographic travel books, features in National Geographic’s stock library and National Geographic Traveler websites.
An example is “Alhambra at Sunset”, published in National Geographic’s World’s Best Travel Experiences book (2012).
Alhambra at Sunset (Canon 5D, 105mm, f/11, 0.5s, ISO 200)
I have been using a mirrorless Fujifilm X-E1 camera for travel photography for the past year. So, why change from something that works? Short answer is very good image quality in a smaller and lighter system.
Is it a complete replacement to DSLR? I don’t think so, but it gives the DSLR a serious run for its money. My images are mainly related to travels and the mirrorless system is a great fit. I suspect for many hobbyists and enthusiasts, the current mirrorless system (e.g. Olympus, Panasonic, Sony, Fujifilm) would suffice. For those more advanced and professionals capturing images of high-speed action, sports, wildlife, etc., high-end DSLRs will likely continue to be the preferred choice for now.
Here are a couple of images from the Fujifilm mirrorless camera.
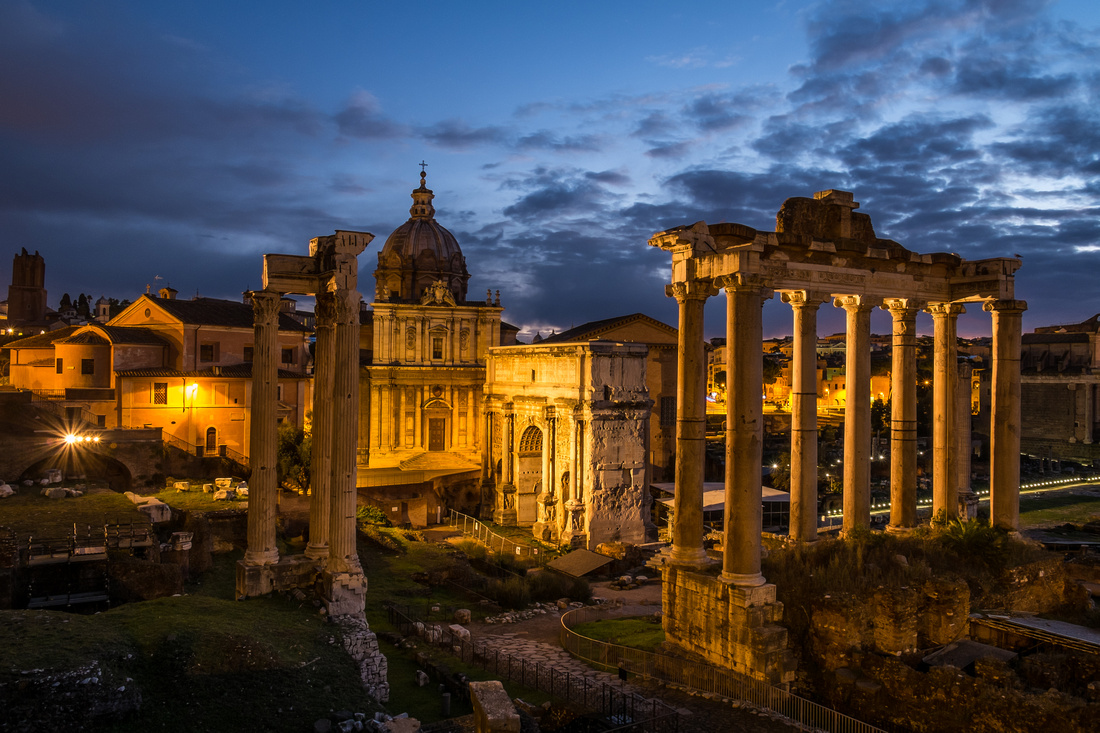
Roman Forum at Dawn (Fujifilm X-E1, 18mm, f/11, 10s, ISO 400)
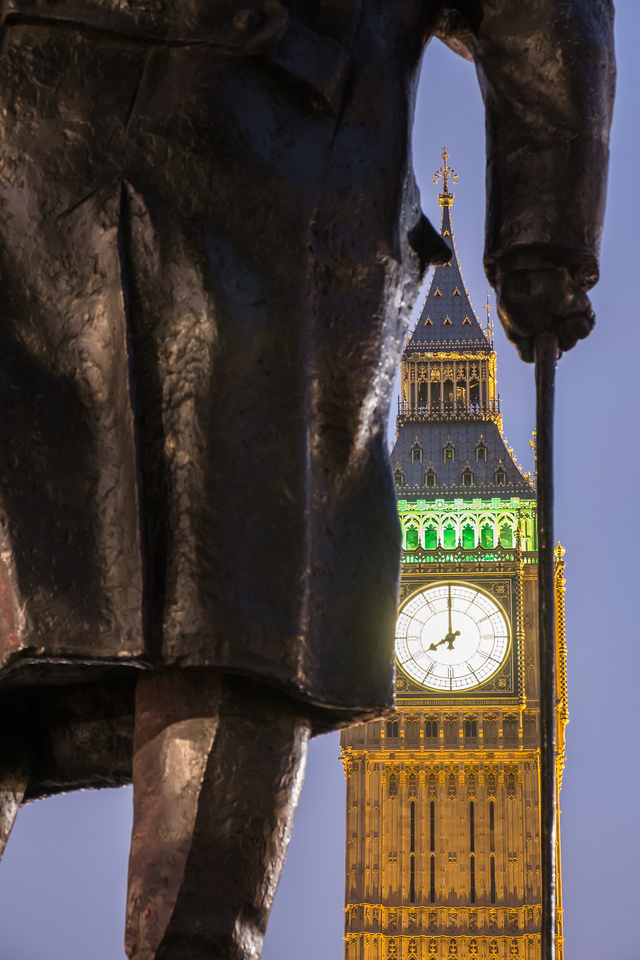
London at Twilight (Fujifilm X-E1, 55mm, f/8, 9s, ISO 400)
National Geographic Traveler recently published a feature entitled “Top 10 Compact Cameras for Travelers”; all the cameras listed were mirrorless cameras.
The photographic systems are undergoing rapid changes with great choices to consumers. The traditional giants of DSLR (Canon and Nikon) are facing great innovation challenges from the likes of Sony, Panasonic, Olympus and Fujifilm. I think the trend towards smaller, lighter system is beneficial to many photographers.
Overall, I'm enjoying the Fujifilm X-E1 for travel photography. Come to think of it, I have not used my Canon 5D DSLR for over a year. I still have a collection of Canon L lenses. Hmm...
In my next article, I'll share some experiences of using a manual fisheye lens with the Fujifilm X-E1 mirrorless camera.
]]>
I used to put away my camera when it gets too "dark" for hand-held images, e.g. after sunset. About 10 years ago, I started using a tripod. Since then, the single most important gear for my travel photography, beside the camera and lens, is a tripod. This enables the use of camera exposures of one second and longer, and the capture of beautiful colors in the sky, city illuminations and reflections.
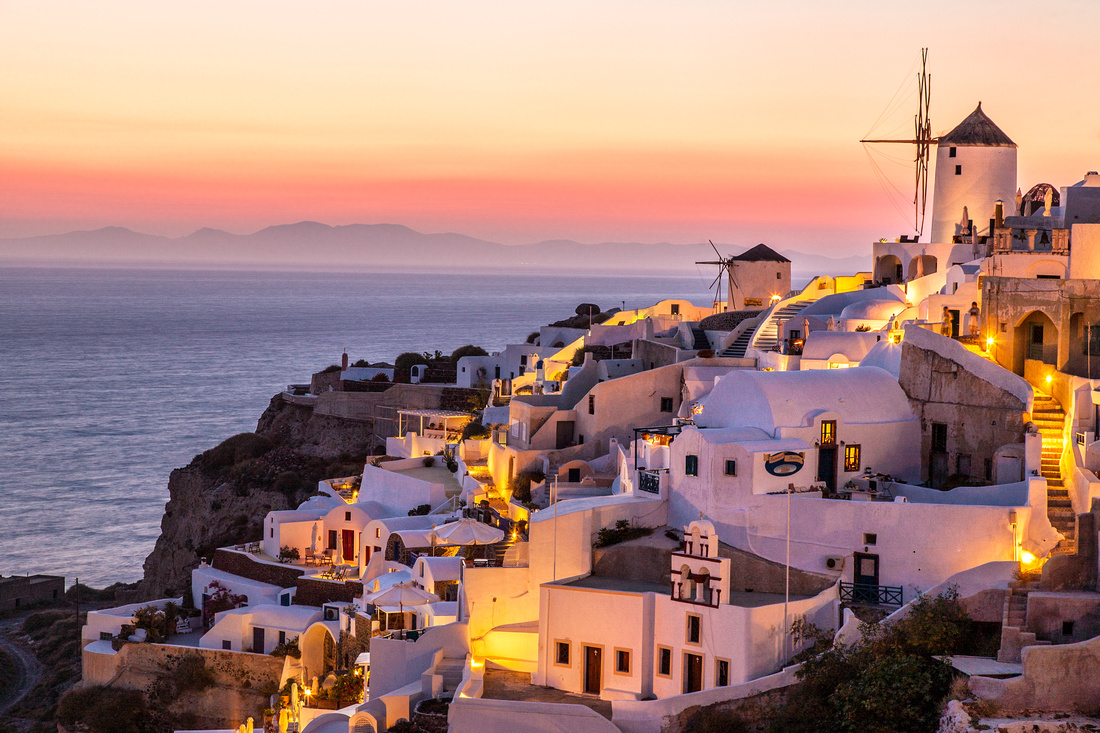
Let's start with an example. The following image of the iconic Oia village in Santorini Island was taken shortly after sunset. This beautiful place is filled with tourists who come for the sunset view and leave right after that; missing out on even more dramatic views that follows the sunset as the village is illuminated and the setting sun imparts its last lights in the sky. This image was featured in Nat Geo Traveler's Your Shot: Golden Hour.
Oia Village at Dusk, Santorini Island, Greece (Canon 5D, 73mm, 8s, f/8, ISO 200)
Following are some tips and techniques for capturing beautiful travel images during that magical part of the evening.
The techniques involved are relatively simple; the practice requires patience, time scouting the location and waiting for the “right” light. Be familiar with your camera equipment and be prepared ahead of time.
- Safety first: research and look around the area. Trust your instincts; it is not worth putting yourself in a dodgy dark place, particularly if you are alone. Be respectful of security officers, particularly around sensitive areas. For example, using a tripod near the Houses of Parliament in London will draw the attention of police officers; this has improved recently but could change again.
- Comfort: Depending on the time of year and location, it can get cold and windy after sunset. I usually bring a light jacket, gloves, and a small flashlight, especially in Europe. And some snacks and water, but don’t drink too much before sunset or you could end up spending your time looking for a comfort break just when the lighting is great…
- Research: read guidebooks; go online to learn the location, orientation of landmarks. Look at post-cards for ideas. Know the sunrise and sunset times.
- Be Patient: You should arrive at the location some time before the sunset to capture the sunset and subsequent twilight period. Then set up the camera equipment and wait for the right lighting.
- Camera equipment: A tripod or some other means to support the camera in a stable manner is most crucial to get the sharpest pictures. For travel photography, a carbon-fiber tripod is lighter weight though it is more expensive. The other key accessory is a cable or remote release to avoid any camera movement during long exposure; the alternative is to use the camera self-timer. A custom L-bracket and a ball head are useful to facilitate movement from landscape to portrait orientation, and for capturing overlapping pictures necessary for subsequent stitching to make panoramic pictures. Generally I remove all lens filters unless I intentionally want to use much longer exposures, perhaps to capture fleeting clouds, silky smooth water surfaces. A polarizer will typically reduce exposure by 2 stops; for greater stops reduction, I’d reach for a 6-stop ND filter. Switch off any lens stabilization while the camera is on a tripod. Use a lens hood to minimize flaring from nearby lights. I also keep the battery charged up the night before. Check the battery level if you have been shooting a lot during the day time. Twilight and night photography requires long exposure that will drain the battery. Better yet, get extra batteries.
- Camera settings: Generally, I shoot in Aperture Priority mode with the following typical settings – ISO: 100 – 200; aperture: f/8 – f/11. The shutter speed is determined by the camera. Check the histogram after exposure and adjust the exposure compensation accordingly. I also use the Noise Reduction option to get cleaner images.
- RAW: I tend to use RAW and small JPEG capture. Capturing in RAW format will allow more post-processing options including correction of the white balance, especially in mixed florescent and incandescent lighting in cities.
Some modern DSLRs are capable of capturing low-light images at high ISOs (>6,400). Some prefer to use high ISOs in conjunction with image stabilization to capture low-light images. My preference, however, is to use a lower ISO and longer shutter speed with a tripod where possible to get the cleanest possible image. It is a matter of personal choice, not right or wrong.
I hope you find these tips useful. Paraphrasing Captain Barbossa in the Pirates of the Caribbean movie “… these are more what you’d call “guidelines” than actual rules.”
Happy traveling and photographing.
A couple more examples to close out.
Rio de Janeiro at Dusk, Brazil (Canon 5D, 24mm, 3s, f/8, ISO 200)
This was featured by Nat Geo Traveler tumblr site leading up to the World Cup.
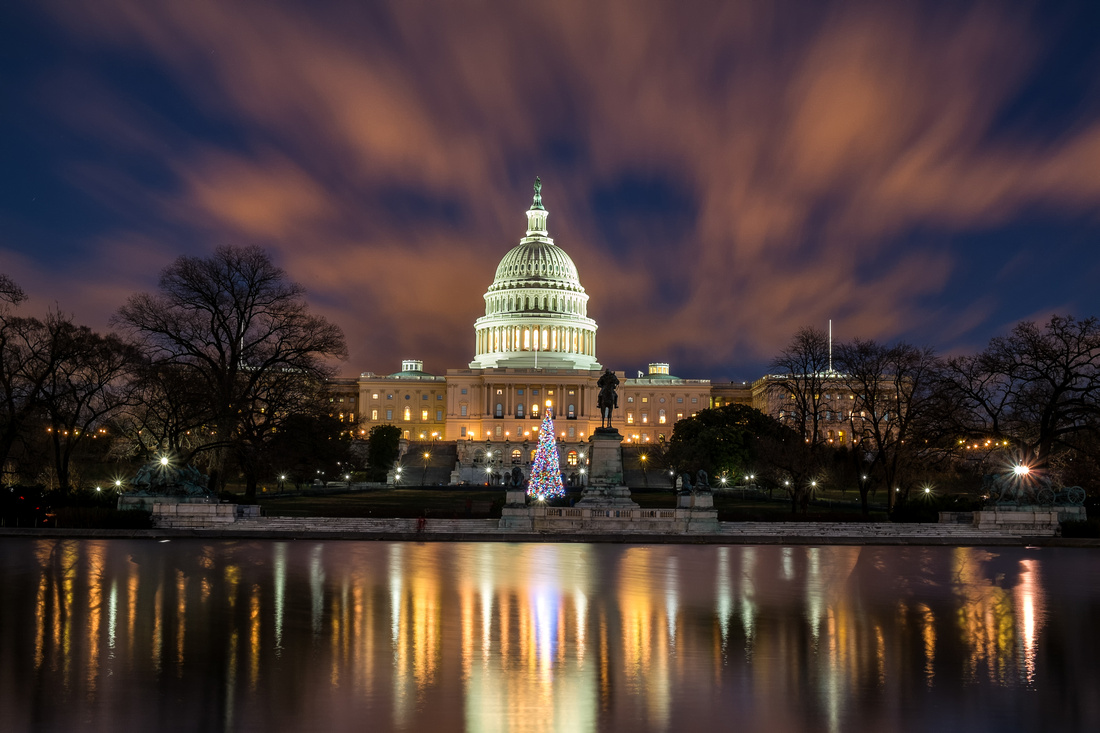
US Capitol at Twilight (Fujifilm X-E1, 29mm, 28s, f/13, ISO 200)
Try Different Perspectives
The Vatican Museum (Musei Vaticani) is renowned for its fantastic collection of Renaissance paintings and sculptures, including the famous Sistine Chapel with ceiling paintings by Michelango.
Towards the end of the tour, visitors descend huge double spiral staircases, designed by Giuseppe Momo in 1932.
Most images of the massive double spiral staircases inside the Vatican Museum were taken from the top looking down like the following.
Vatican Staircase - Looking Down (Fujifilm X-E1, 8mm, 1/30s, f/5.6, ISO 2500). This image was featured in National Geographic Your Shot: Italy.
I tried different perspectives with a fisheye lens.
I took the following image from the bottom of the stairs looking up, shortly before the museum closed and after most visitors had left. I’m pleased that the image was featured on National Geographic Travel 365 on 24-Feb-2014. It was also featured on National Geographic's tumblr post.
Vatican Staircase - Looking Up (Fujifilm X-E1, 8mm, 1/15s, f/5.6, ISO 500)
Here's another in "portrait" orientation. It is my most viewed photograph on the 500px site.
Vatican Staircase (Fujifilm X-E1, 8mm, 1/15s, f/5.6, ISO 1000)
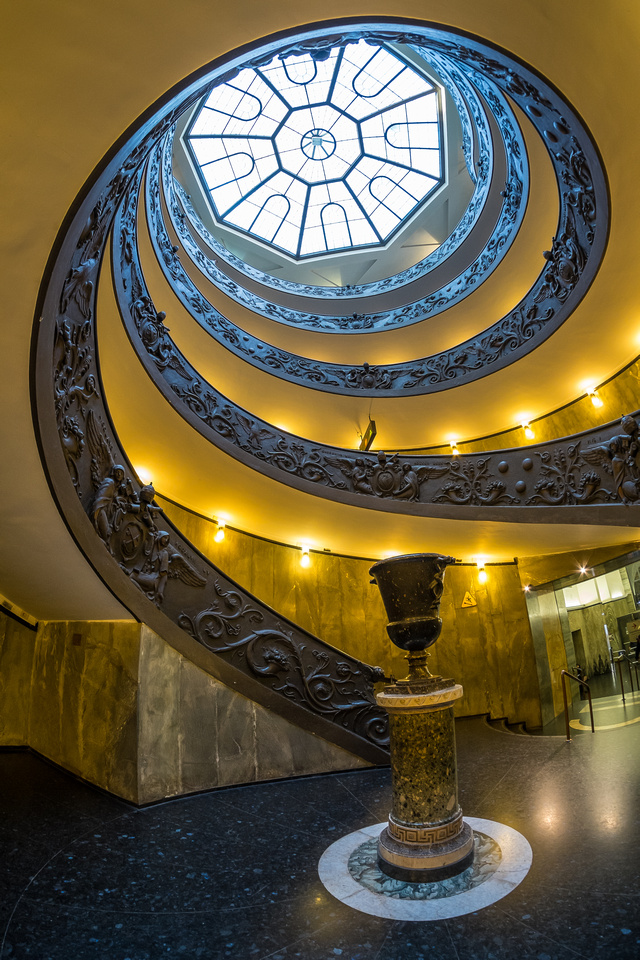
These images were some of my early experiences with using a fisheye lens. The fisheye lens is of course, just a tool and to be used appropriately. I think it is well suited to capture circular, spiral architectural features like these monumental staircases inside the Vatican Museum. Further experiences and tips using the fisheye lens will be described in an upcoming blog.
Keep experimenting with different view perspectives.
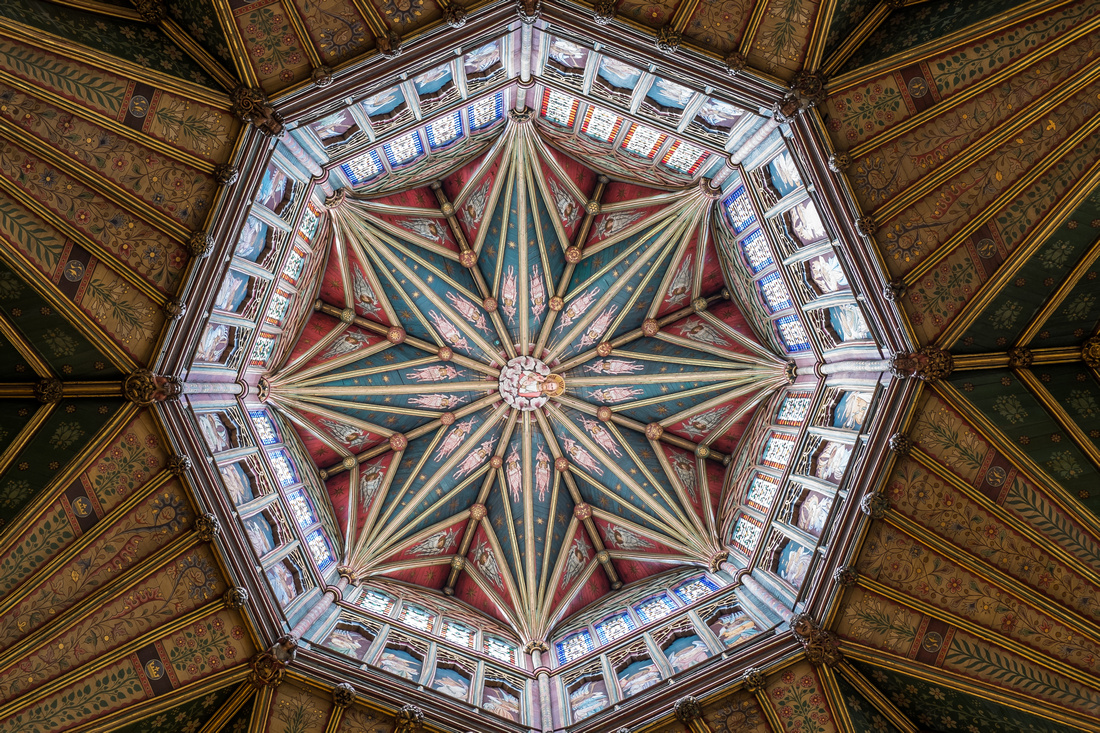
]]>Ely is a delightful small town in Cambridgeshire, England. Its historic cathedral dates back over 1,300 years; it was built on the highest land in the fens (marshy areas before drainage in the 17th century). This beautiful and welcoming cathedral is famous for its Octagon Tower. The Octagon was built to replace the stone central tower that collapsed in 1322; it was constructed with timber and cleverly painted to match stone work.
I'm amazed how these magnificent, soaring structures were built centuries ago.
Ely Cathedral allows the use of tripod for a modest 2 GBP fee. I arrived early to get clear views without interrupting other visitors, especially when using the tripod.
Here are a few selected images.
Portrait perspective of the nave with the famous Octagon towards the upper third of image:
Ely Cathedral (Fujifilm X-E1, 8mm, 3.5s, f/8, ISO 200)
Looking straight up at the Octagon with intersecting transepts:
Ceiling of Ely Cathedral (Fujifilm X-E1, 8mm, 4s, f/11, ISO 200)

A closer view of the painted Octagon ceiling (Fujifilm X-E1, 43mm, 4s, f/11, ISO 200)
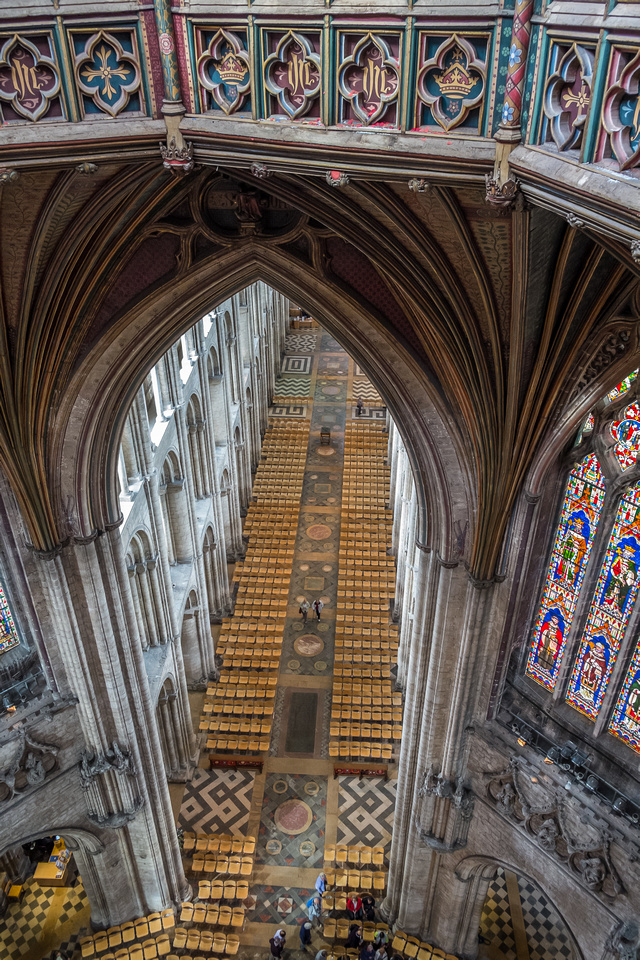
The Octagon Tower is worth a visit (additional fee). A guide takes visitors up narrow spiral stone stairs to the view the wooden structures supporting the Octagon.
Here's a view looking down:
Look Down from the Octagon Tower (Fujifilm X-E1, 18mm, 1/30s, f/3.6, ISO 2500)
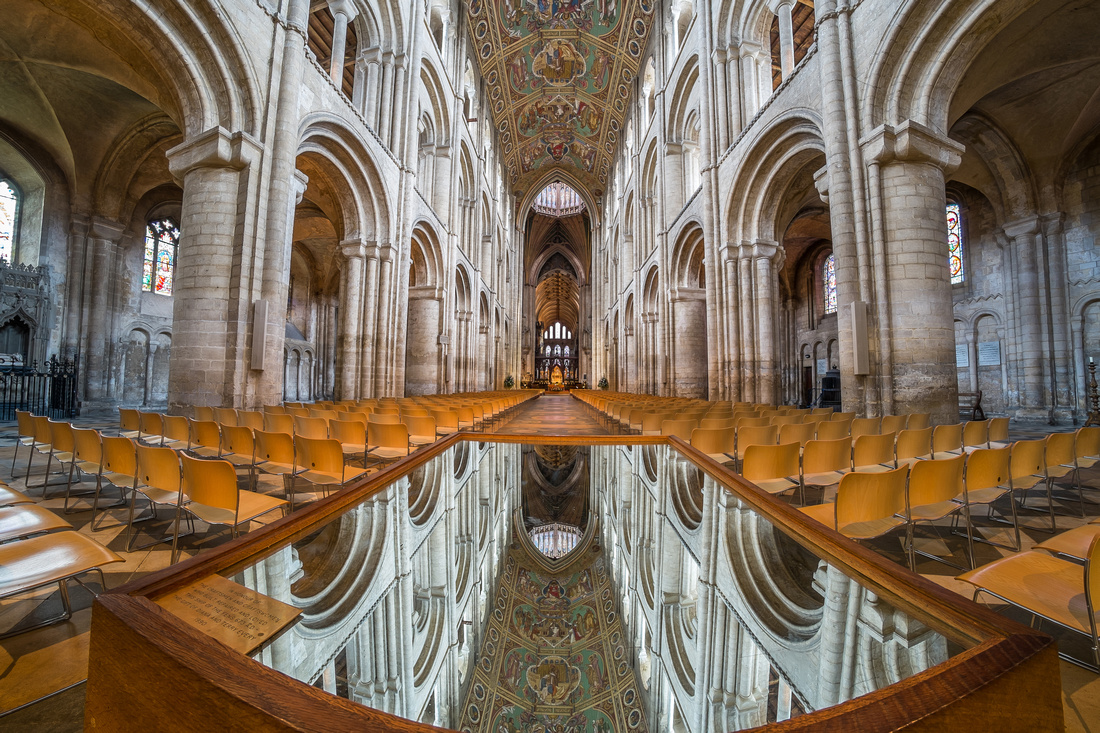
Mirror Reflections of the Victorian-era Painted Ceilings (Fujifilm X-E1, 8mm, 2.6s, f/11, ISO 200)
I was pleased to spend a morning at this enchanting medieval cathedral.
]]>